Learn how to reset the fingerprint on your iPhone by understanding iPhone security settings, deleting existing fingerprint data, and adding a new fingerprint for authentication.Are you having trouble with your iPhone fingerprint recognition? Whether you’re experiencing issues with your current fingerprint or simply want to start fresh with a new one, you’re in the right place. In this blog post, we will explore the process of resetting your fingerprint on an iPhone. From understanding the basics of iPhone fingerprint reset to accessing the necessary security and Touch ID settings, we’ve got you covered.
We’ll walk you through the steps of deleting your existing fingerprint data and adding a new one. Additionally, we’ll discuss the importance of testing the new fingerprint authentication to ensure it’s working seamlessly. By the end of this post, you’ll have all the knowledge and tools you need to reset your iPhone fingerprint with confidence. Let’s get started on troubleshooting and improving your iPhone’s fingerprint recognition.
Understanding iPhone Fingerprint Reset
When it comes to understanding how to reset the fingerprint on your iPhone, it’s important to first grasp the basics of the Touch ID system and the security settings that are involved. The Touch ID system is a biometric authentication technology that allows you to unlock your device and make purchases using your fingerprint. The fingerprint data is securely stored in the device’s Secure Enclave, ensuring the privacy and security of your personal information.
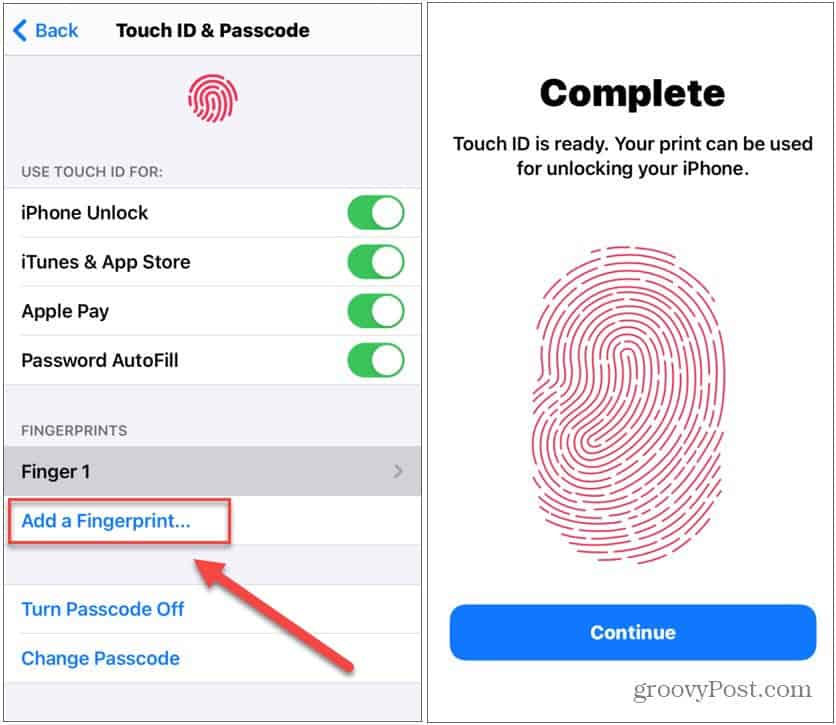
In order to access the security and Touch ID settings on your iPhone, you can navigate to the Settings app and tap on Touch ID & Passcode. Here, you can view and manage the fingerprints that are currently registered on your device, as well as adjust the settings for using Touch ID to unlock your phone, authorize purchases, and more.
If you’re looking to reset the fingerprint on your iPhone, you may want to start by deleting the existing fingerprint data that is stored on the device. By removing the old fingerprint data, you can create a fresh start and add a new fingerprint for enhanced security and convenience.
To delete existing fingerprint data, go to the Touch ID & Passcode settings, enter your passcode, and then tap on the fingerprint that you want to remove. From there, you can select Delete Fingerprint to erase the old data from your device.
After deleting the existing fingerprint data, you can proceed with adding a new fingerprint to your iPhone. This process involves placing your finger on the Home button and following the on-screen instructions to capture the unique characteristics of your fingerprint. Once added, you can test the new fingerprint authentication to ensure that it works effectively for unlocking your phone and authorizing purchases.
Accessing Security & Touch ID Settings
Understanding iPhone Fingerprint Reset
One of the first steps in resetting your iPhone’s fingerprint data is to access the Security & Touch ID settings. To do this, open the Settings app on your iPhone and scroll down until you find the Touch ID & Passcode option. Tap on it to proceed to the next step.
Once you are in the Touch ID & Passcode settings, you will be prompted to enter your passcode. After entering your passcode, you will see a list of options related to Touch ID and security settings.
In this menu, you can manage the fingerprints that are currently stored on your iPhone, as well as make changes to the passcode and other security settings. This is where you will be able to delete existing fingerprint data and add new fingerprints to your device.
It is important to note that accessing the Security & Touch ID settings requires you to have the passcode for your device. This is an added layer of security to prevent unauthorized access to these sensitive settings.
- Delete existing fingerprint data
- Add a new fingerprint
- Manage security settings
- Access passcode settings
| Security & Touch ID Settings | Actions |
|---|---|
| Delete existing fingerprint data | Tap on the fingerprint you want to delete and then select Delete Fingerprint to remove it from your device. |
| Add a new fingerprint | Choose the Add a Fingerprint option and follow the on-screen instructions to add a new fingerprint to your device. |
Deleting Existing Fingerprint Data
When it comes to iPhone security, it’s important to regularly review and update your fingerprint data. Whether you want to remove an old fingerprint or make room for a new one, it’s crucial to know how to delete existing fingerprint data. By doing so, you can ensure that your device only recognizes the most current and secure fingerprints. To delete existing fingerprint data on your iPhone, follow these simple steps:
Step 1: Start by opening the Settings app on your iPhone and scrolling down to Touch ID & Passcode.
Step 2: You will be prompted to enter your passcode, after which you can access the Fingerprints section.
Step 3: Here, you will see a list of all the saved fingerprints on your device. Select the fingerprint you want to delete by tapping on it.
Step 4: Finally, tap on Delete Fingerprint and confirm the action by pressing Delete when prompted. This will remove the selected fingerprint from your device’s memory.
Adding a New Fingerprint
When it comes to adding a new fingerprint to your iPhone, it’s a fairly simple process that can be done in just a few steps. First, you’ll want to navigate to the Settings app on your iPhone and select Touch ID & Passcode. From there, you’ll be prompted to enter your passcode to access the security and Touch ID settings.
Once you’re in the Touch ID & Passcode settings, you can select Add a Fingerprint to begin the process of adding a new fingerprint to your device. You’ll then be instructed to place the finger you want to add on the Touch ID sensor, and follow the on-screen instructions to complete the scanning process. It’s important to try to cover as much of your fingerprint as possible to ensure the most accurate and secure authentication.
After you’ve successfully scanned your fingerprint, you’ll have the option to name the added fingerprint to keep track of multiple fingerprints. This is especially useful if you plan to add more than one fingerprint to your device, such as for family members or for different fingers on your own hand.
Once your new fingerprint has been added and named, you can then use it to unlock your iPhone, access secure apps, and make secure payments using Apple Pay. The added fingerprint will be stored securely on the device, providing a convenient and secure way to authenticate your identity without the need to enter a passcode.
Testing the New Fingerprint Authentication
After adding a new fingerprint to your iPhone, it is important to test the new fingerprint authentication to ensure that it is working properly. This will provide you with the peace of mind that your fingerprint will be recognized when you attempt to unlock your device or access sensitive information.
One way to test the new fingerprint authentication is by locking your iPhone and then attempting to unlock it using the newly added fingerprint. If the fingerprint is recognized successfully and the device unlocks, then you can be confident that the new fingerprint authentication is working as intended. If the fingerprint is not recognized, you may need to revisit the process of adding the fingerprint to ensure that it was done correctly.
Additionally, you can test the new fingerprint authentication by accessing apps or features that require your fingerprint for access. This can include making a purchase on the App Store, accessing sensitive data within certain apps, or using Apple Pay. By using the new fingerprint for these actions, you can verify that it is functioning properly in various scenarios.
It is also important to periodically test the new fingerprint authentication to ensure that it continues to work effectively over time. Factors such as changes in your fingerprint due to injury or aging, as well as updates to the iPhone’s software, can impact the performance of the fingerprint authentication. By regularly testing the fingerprint, you can identify any issues early on and take the necessary steps to address them.
Frequently Asked Questions
Can I reset my fingerprint on iPhone?
Yes, you can easily reset your fingerprint on iPhone by accessing the Touch ID & Passcode settings.
What are the steps to reset fingerprint on iPhone?
First, go to Settings, then Touch ID & Passcode. Next, enter your passcode and select the fingerprint you want to delete. Finally, tap on 'Delete Fingerprint' to reset it.
Will resetting my fingerprint affect my other phone settings?
No, resetting your fingerprint will not affect any other settings on your iPhone.
Can I add a new fingerprint after resetting the old one?
Yes, after resetting the old fingerprint, you can add a new one by going to Touch ID & Passcode settings and selecting 'Add a Fingerprint'.
Is it necessary to reset my fingerprint if I suspect someone else has accessed my phone?
Yes, it is advisable to reset your fingerprint and passcode if you suspect unauthorized access to your phone for security purposes.
Does resetting fingerprint require internet connection?
No, resetting your fingerprint on iPhone does not require an internet connection as it is a local setting on your device.
Can I use a different finger to reset my fingerprint on iPhone?
Yes, you can use a different finger to reset your fingerprint by adding the new fingerprint in the Touch ID & Passcode settings.


0 Comment